Creating Non-Proxy Authentication AAA Servers for a Standby Cluster
A non-proxy AAA server is used when the APs connect to the external AAA server directly.
- Go to .
- Select the Non-Proxy (AP Authenticator) tab, and then select the zone for which you want to create the AAA server.
- Click Create.
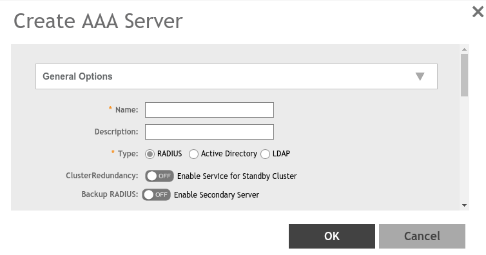
- Configure the following options:
- General Options
- Name: Enter a name for the AAA server that you are creating.
- Description: Enter a short description of the AAA server.
- Type: Select the type of AAA server that you are creating. Options include RADIUS, Active Directory and LDAP.
- Cluster Redundancy: Select the Enable Service for Standby Cluster option to enable cluster redundancy.
- Backup RADIUS (displays if you selected RADIUS as the Type): Select the Enable Secondary Serveroption if a secondary RADIUS server exists on the network.
- Global Catalog (displays if you selected Active Directory as the Type): Select the Enable Global Catalog support if you the Active Directory server to provide a global list of all objects.
- Primary Server
- If you selected
RADIUS, configure the following
options:
- IP Address: Enter the IP address of the AAA server. Both IPv4 and IPv6 addressing formats are supported.
- Port: Enter the port number of the AAA server. The default RADIUS server port number is 1812.
- Shared Secret: Enter the AAA shared secret.
- Confirm Secret: Re-enter the shared secret to confirm.
If you have enabled the secondary server for Backup RADIUS, you must provide similar information as in the primary server.
Refer to RADIUS Service Options for more information.
- If you selected
Active Directory, configure the
following options:
- IP Address: Enter the IPv4 address of the Active Directory server.
- Port: Enter the port number of the Active Directory server. The default port number (389) must not be changed unless you have configured the Active Directory server to use a different port.
- Windows Domain Name: Enter the Windows domain name assigned to the Active Directory server (for example, domain.ruckuswireless.com).
- If you selected
LDAP, configure the following
options:
- IP Address: Enter the IPv4 address of the LDAP server.
- Port: Enter the port number of the LDAP server. The default port number is 389.
- Base Domain Name: Enter the base domain name in LDAP format for all user accounts (for example, dc=ldap,dc=com).
- Admin Domain Name: Enter the administrator domain name in LDAP format (for example, cn=Admin;dc=Your Domain,dc=com).
- Admin Password: Enter the administrator password for the LDAP server.
- Confirm Password: Re-enter the administrator password to confirm.
- Key Attribute: Enter a key attribute to denote users (for example, default: uid)
- Search Filter: Enter a search filter (for example, objectClass=Person).
- If you selected
RADIUS, configure the following
options:
- General Options
- Under
User Role Mapping, click
Create to create a user traffic profile mapping.
6.0 updateNote: While mapping group attribute value to a user role, avoid special characters, wild-card entries, or duplicate entries regardless of the order. Only the firs-matched entry will be mapped to the user role.
- In the Group Attribute Value field, enter the value to be sent from AAA as part of an Access-Accept.
- Select a user role from the User Role list or click + to create a user role. For more information, refer to the section Creating a User Role in the Administration Guide.
- Select a firewall from the Firewall Profile list, select a firewall or click + to create a new firewall profile. For more information, refer to the section Managing Firewall Profile in the Administration Guide.
- Click OK.