Configuring TACACS+ Users
You can add one or more users to your
TACACS+ configuration. The reason to add individual users would be if the users do
not
belong to a group that already exists in your LDAP server.
Configuration Steps
Follow these steps to add a user:
- In the Cloudpath UI, go to TACACS+ > TACACS+ Users.
- Highlight the Users tab.
- Click Add User.
- Configure the values to add a
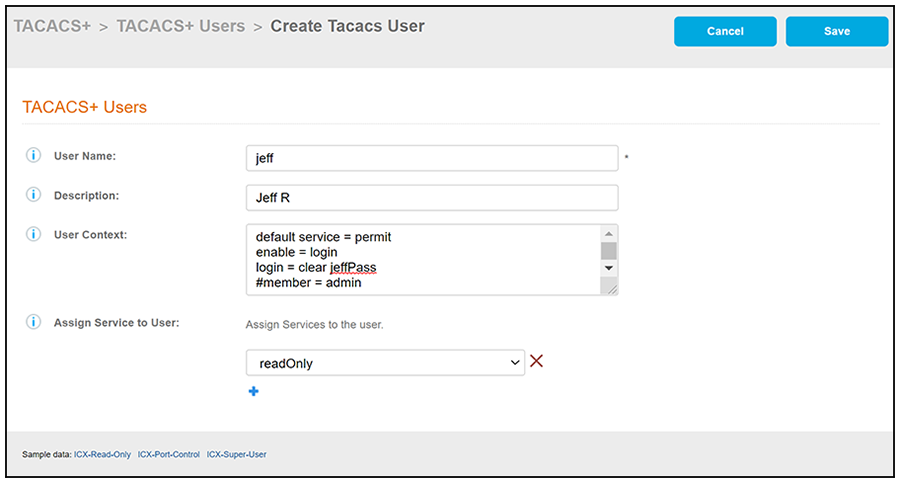
TACACS+ user, as shown in the following example.
- User Name: A descriptive name for the user; this is used for reference when building the configuration profile. No spaces are allowed in the name.
- Description: (Optional) Description of the user.
- User Context: Configure
the values to create a TACACS+ user. The following list describes the
entries that are shown in the example screen above:
- default service: You can use the default service statement to either permit or deny a service that is not explicitly defined in the user profile. In the example screen above, such services will be permitted.
- enable: enable = login grants enable mode upon successful user login. This omits the secondary password query and allows the user to enter enable mode with the login password, or permit an anonymous enable.
- login: You can use a login statement to set the user password and choose whether or not to encrypt it. In the example, the password is set to "jeffPass" and the clear option denotes to not encrypt this password.
Sample data: You can quickly populate the User Context field by clicking any of the "Sample data" options in the lower-left portion of the screen. Each option is named according to what function it will provide to the user. You can click each option to view the statements each provides.
- Assign Service to User: A drop-down list from which you select one of the configured services to be associated with this user. You can add additional services to the user by clicking the + button and selecting another service.
- Click Save.
- Add and configure any additional
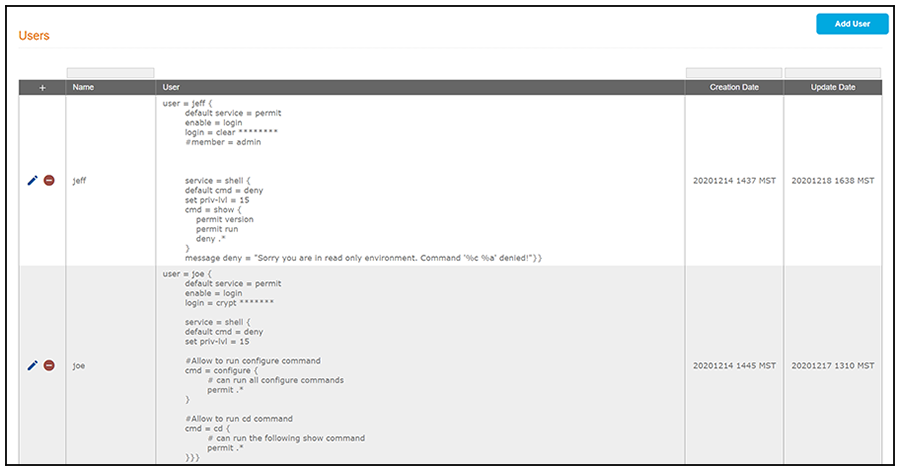
users. The following screen is an example of the main Users configuration screen
and its information after several users have been configured.
Note: When you add your configuration profiles, you will be able to select any or all of the users you have configured to be part of a specific profile.
Other Actions You Can Perform From Main Users Configuration Screen
Some of the actions you can take from the main Users Configuration screen (Users Screen Example After Adding Several Users) include:
- Deleting a user configuration:
Click the X in the column
to the left of the name of the configuration, then confirm the deletion when
prompted.
Note: A minus sign indicates that the user configuration cannot be deleted because it is being referenced by a configuration profile. You would have to first remove the configuration from the configuration profile if you want to be able to delete it from the main User Configuration screen.
- Editing a user configuration: Click the pencil icon in the column to the left of the name of the configuration, then make and save any edits in the ensuing screen.