Configuring an Active - Standby Replication
The following figure depicts an active - standby setup, with example IP addresses that will be used throughout this topic.
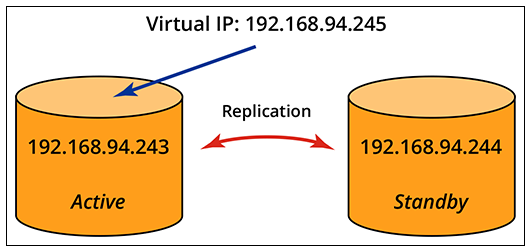
The steps below show you how to configure this type of cluster. It is assumed that you have already deployed two Cloudpath ES systems with the same .OVA file.
- On the Cloudpath system that you want to be the "active" system (192.168.94.243 in
the figure), open a terminal window and log in to the service account:
- Port 8022 with SSH unless you change the port number
- Username: cpn_service
- Password: Enter the password.
The command-line configuration utility prompt (#) should display.
- Enter the command: replication setup
- When presented with cluster-type options, select Active-Standby and continue.
- When you are asked if you want the node you are on to be the primary database node,
answer yes and continue:
Do you want this node (192.168.94.243) to be the primary database node? [y/n]
- Enter the IP address of the standby node when you are prompted for the "Secondary
node IP:"
Secondary database cluster node configuration:

  Secondary node IP: 192.168.94.244
- Enter 8022 for the SSH port of the standby node when prompted (unless you have changed
this port number):
Secondary node SSH Port: 8022
- When presented with the following warning, you can answer yes and proceed:
------------------------------------------------------------------------------ WARNINGS: Configuring the cluster will cause any data existing on 192.168.94.244 be deleted and replaced with the data currently on 192.168.94.243 ------------------------------------------------------------------------------ Do you want to continue? [y/n] - You will then be presented with the following to confirm that your setup is what you
expect:
 192.168.94.244 will be the secondary database cluster node.

 ------------------------------------------------------------------------------
   Database cluster has been defined:
     Primary: 192.168.94.243   ssh port# 8022
     Secondary: 192.168.94.244   ssh port# 8022

     Cluster Type: Active-Standby
 ------------------------------------------------------------------------------

  Is this correct? [y/n]
If the information above is correct (as it is for this example), answer yes and proceed.
- You are then prompted to enter the Virtual IP address. Be sure that the Virtual IP
you enter is in the same domain as the primary and secondary nodes and that you enter
an IP address not currently in use, then proceed:
Virtual IP: 192.168.94.245
- You are then presented with the following:
------------------------------------------------------------------------------ Cluster DNS Name - The cluster as a whole must have a single unified DNS name it is known as. This is most likely the fully qualified domain name (FQDN) of the HTTPS certificate for the enrollment portal as a whole. This DNS name in most cases will resolve to the load balancer fronting the cluster. Example: Node 1 : node1.my-company.com Node 2 : node2.my-company.com Cluster DNS Name : wifi-onboarding.my-compandy.com IMPORTANT: If certificate based enrollments already exist you must re-use the hostname that was in place at the time of the enrollments occurred as the "Cluster DNS Name". If this name is modified, all existing certificates will be invalidated as their OCSP URL will no longer match the answering address of the CA (which must be the cluster as a whole.) Cluster DNS Name: jeff243.cloudpath.net - Please ensure this is correct. - This name should match up with the host portion of the "OCSP URL" within the browser based Admin UI. See "Certificate Authority > Manage CAs" If this is a new install you may want to create a new root CA if this does not match. - This value may not be changed after certificate based enrollments occur without requiring users to re-enroll. ------------------------------------------------------------------------------ Do you want to keep jeff243.cloudpath.net? [y/n] - You are then presented with the following:
------------------------------------------------------------------------------ Cluster Name is set: jeff243.cloudpath.net. At later time, you will need to make DNS changes: Assign jeff243.cloudpath.net to 192.168.94.245 (Virtual IP). Rename hostname of the primary Database node. ------------------------------------------------------------------------------ Do you want to continue? [y/n]Note: The dialogue informs you that you will need to make some DNS changes. This is described following these numbered steps. - The process completes, as shown in the following example. Check that you receive "Replication
cluster setup complete:"
Will establish ssh 192.168.94.244:8022 ...
 ------------------------------------------------------------------------------
    * You will be prompted for the password of the remote VM 192.168.94.244.
 ------------------------------------------------------------------------------
yes: standard output: Broken pipe
yes: write error
/usr/bin/ssh-copy-id: INFO: Source of key(s) to be installed: "/home/repl_user/.ssh/id_rsa.pub"
cpn_service@192.168.94.244's password:
id_rsa.pub                                                                                                100%  406     1.1MB/s   00:00
Checking remote host 192.168.94.244 ...
Will copy cluster configuration to node 192.168.94.244 ...
Will establish ssh from 192.168.94.244 to 192.168.94.243 ...
SSH connection from 192.168.94.244 to 192.168.94.243: SSH test succeeded
Will update network configuration ...
Will update database server configuration ...
Will stop local application service ...
Will restart database service...
Will configure local database service permission ...
Will transfer application database to the secondary database node at 192.168.94.244 ...
Will restart local application service ...
Will provision new remote node 192.168.94.244 ...
Done provisioning new remote node 192.168.94.244 :
Will replicate web cluster name jeff243.cloudpath.net ...
Will replicate web cluster name jeff243.cloudpath.net on 192.168.94.244 ...
Done replicating web cluster name.
Will configure keepalived on 192.168.94.243 ...
Created symlink from /etc/systemd/system/multi-user.target.wants/keepalived.service to /usr/lib/systemd/system/keepalived.service.
Done keepalived configuration on 192.168.94.243 ...
Will configure keepalived on on 192.168.94.244 ...
Created symlink from /etc/systemd/system/multi-user.target.wants/keepalived.service to /usr/lib/systemd/system/keepalived.service.
Done keepalived configuration on 192.168.94.244 ...
Will enable local cluster monitoring service ...
Created symlink from /etc/systemd/system/multi-user.target.wants/cloudpath-repld.service to /etc/systemd/system/cloudpath-repld.service.
Will enable cluster monitoring service on 192.168.94.244 ...
Created symlink from /etc/systemd/system/multi-user.target.wants/cloudpath-repld.service to /etc/systemd/system/cloudpath-repld.service.
Replication cluster setup complete.
#
Verifying That the Cluster was Properly Created With Two DB Nodes:
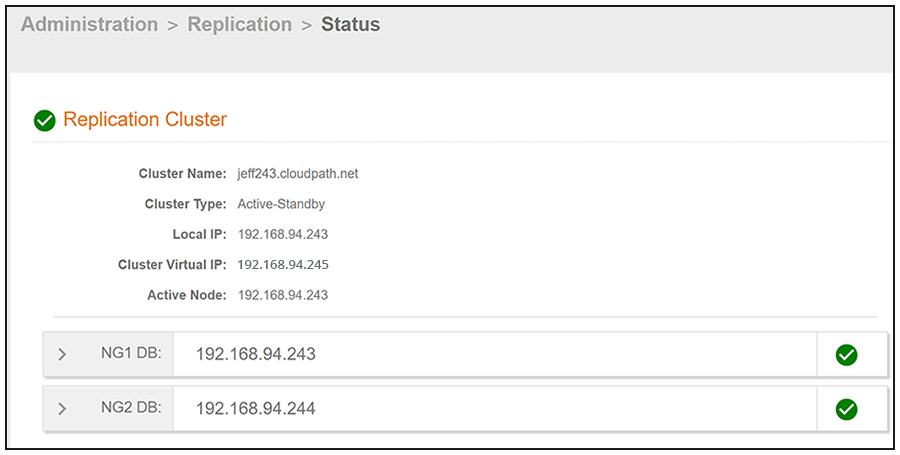
To verify that your two-DB-node replication has been created correctly, follow these steps:
- Log in to the Cloudpath UI on any either of the two DB nodes in the cluster.
- Go to Administration > Replication.
- Make sure that the status indicates that both nodes are present in the cluster and have green check marks next to their names. as shown in the screen below that is based on the example in the topology presented in this section.
Changes to Make Before Using Cluster for Enrollments:
Before you begin using the cluster for enrollments, you need to make the DNS changes (using your DNS configuration tool) that were listed in the command dialogue as you entered your information. Those changes are necessary for the virtual IP to be able to failover to the secondary node if the primary node goes down. In the example shown above, two DNS changes are required:
Cluster Name is set: jeff243.cloudpath.net.
   At later time, you will need to make DNS changes:
     Assign jeff243.cloudpath.net to 192.168.94.245 (Virtual IP).
     Rename hostname of the primary Database node.