Adding Application Nodes to a Cluster
The following figure depicts an active-active topology with example IP addresses. This topology will be used to illustrate the steps you take to add application nodes to the cluster. For the purposes of this example, complete steps and output will be shown for adding the NG1 APP to the cluster from its corresponding NG1 DB node.
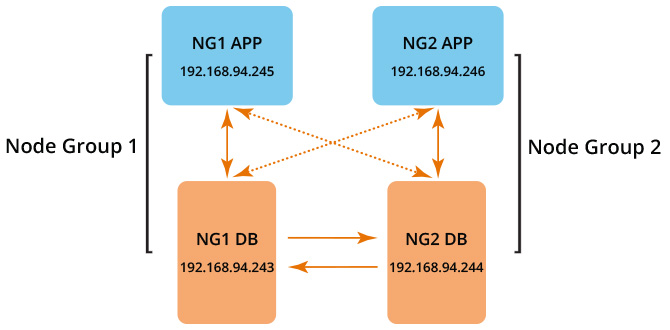
The basic steps to configure a topology of node groups are:
- From the command line interface of the primary DB node, configure all application nodes, one at a time, that are part of the same node group as the primary DB.
- From the command line interface of the secondary DB node, configure all application nodes, one at a time, that are part of the same node group as the secondary DB.
Follow the steps below to add an application node to a cluster. The steps shown use the example of adding the application node 192.168.94.245 to the database node 192.168.94.243.
Procedure to Configure Application Server Nodes:
- On the database node from which you
are adding the application node belongs to, open a terminal window and log in
to the
service account:
- Port 8022 with SSH unless you change the port number
- Username: cpn_service
- Password: Enter the password.
The command-line configuration utility prompt (#) should display.
- Enter the command: replication add-appnode
- You are presented with the following output, to which you can answer yes:
------------------------------------------------------------------------------ * You will be prompted for the password of local system. ------------------------------------------------------------------------------ ------------------------------------------------------------------------------ WARNINGS: 1. This routine must be performed on one of Database nodes in the cluster which replication between DB servers has been established. 2. After the APP node is added to the cluster, all database activities will be redirected to the replicated database servers in the cluster. The local database in the APP server will not be accessible. 3. This routine is only applicable to the ACTIVE-ACTIVE cluster setup. ------------------------------------------------------------------------------ Do you want to continue? [y/n] - Next, you are presented with the following output and prompt:
You are on Server:
   Server ID     DB Server IP
   1             192.168.94.243

  Do you want to add an APP node through this database server node? [y/n]
Confirm that the information is correct, then answer yes to continue.
- You are then prompted to enter the IP address of the application node you wish to
add. Enter the IP address, then press Enter:
APP Node IP: 192.168.94.245
- You are then prompted to enter the SSH port of the application node. Enter the port
number and press Enter.
APP Node SSH Port: 8022
- You are then provided with information about the database access priority for the
application node:
  DB access-priority order from this APP Node:
   Server ID    DB Server IP
   1            192.168.94.243
   2            192.168.94.244
 ------------------------------------------------------------------------------

  Is this correct? [y/n]
- You are then prompted for the cpn_service password for the application
node:
Establish ssh 192.168.94.245 8022 ...
 ------------------------------------------------------------------------------
    * You will be prompted for the password of the remote VM 192.168.94.245.
 ------------------------------------------------------------------------------
/usr/bin/ssh-copy-id: INFO: Source of key(s) to be installed: "/home/repl_user/.ssh/id_rsa.pub"
cpn_service@192.168.94.245's password:
Enter the password, then press Enter.
- The following display shows the completion of the command once you enter the
password of the node to add. Check that the end of the display indicates that
the
node has been added to the cluster.
id_rsa.pub                                                                                                100%  406    40.0KB/s   00:00
Checking remote host 192.168.94.245 ...
Will stop application services on 192.168.94.245 ...
Will update the peer APP server 192.168.94.245 ...
Will add shiro_user@192.168.94.245 on local DB server ...
Will add shiro_user@192.168.94.245 on remote DB server 192.168.94.244 ...
Will setup proxysql on APP server 192.168.94.245 ...
Done setup proxysql on APP server 192.168.94.245.
Will configure application name on App server 192.168.94.245 ...
Done Application Server Name configuration on App server 192.168.94.245.
Will update cluster for peer DB server ...
Will notify cluster changes ....
Done cluster change notification on local system
Will notify cluster changes on the remote DB server 192.168.94.244 ...
Done cluster change notification on the remote DB server 192.168.94.244.
Will disable and stop mysql service on 192.168.94.245 ...
Done disabling and stopping mysql service on 192.168.94.245 ...
Will restart remote application services on 192.168.94.245 ...

192.168.94.245 has been successfully added into the cluster.
In the example topology shown in Cluster With Two Database Nodes and Two Application Nodes, there are no more application nodes to add to Node Group 1. If there were more APP nodes to add to Group 1, you would follow the preceding procedure for each node.
Once you have added all application nodes to Node Group 1, you need to log into the command line interface on the DB node for Node Group 2, then follow the same basic steps as shown above to add the Node Group 2 application nodes. In the example presented in this topic, you would be logging into NG2 DB (IP address of 192.168.94.244) to add the NG APP (IP address of 192.168.94.246).
Verifying That the Cluster was Properly Created:
To verify that your cluster has been created correctly, follow these steps:
- Log in to the Cloudpath UI on any of the nodes (DB or APP) in the cluster.
- Go to Administration > Replication.
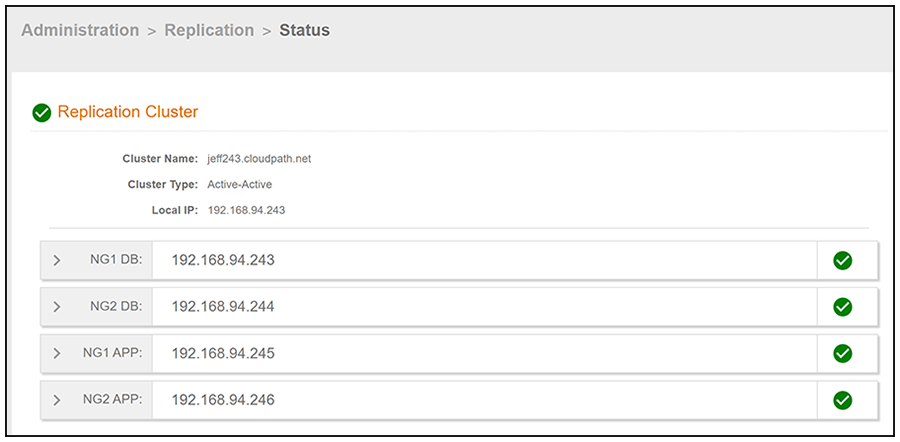
- Make sure that the status indicates that all nodes are present in the cluster and have green check marks next to their names. as shown in the screen below that is based on the example in the topology presented in this section.