Managing eDPSK Pools and DPSKs
Refer to:
DPSK Pools
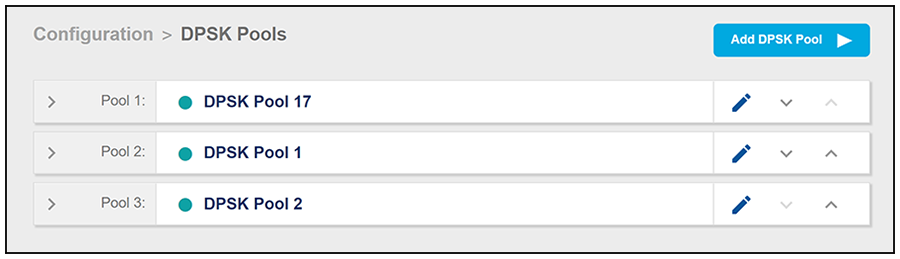
If you go to Configuration > DPSK Pools, you can view the pools that have been created:
Here are a few things you can do:
- Reorder the list: Each time you create a new pool, this pool goes to the top of the list. Pools are searched from top to bottom when a match for an SSID is being looked up. If you wish to reorder the pools, use the arrows to the right of the pool you wish to move up or down.
- Editing the configuration settings: To edit the settings of a pool, click the pencil icon to the right of the pool name. The configuration screen for that pool is invoked, and you can make any changes you want.
- Cleanup options: If you wish to delete all DPSKs belonging to a pool, scroll to the bottom of the
configuration screen, and expand "Cleanup." You then have the options of deleting
all the DPSKs belonging to the pool but leaving the pool itself in tact, or deleting
the DPSKs and destroying the pool.
Note: If you choose either option, be sure that is what you really want to do before confirming the popup warning that appears if you try to take either action.
DPSKs
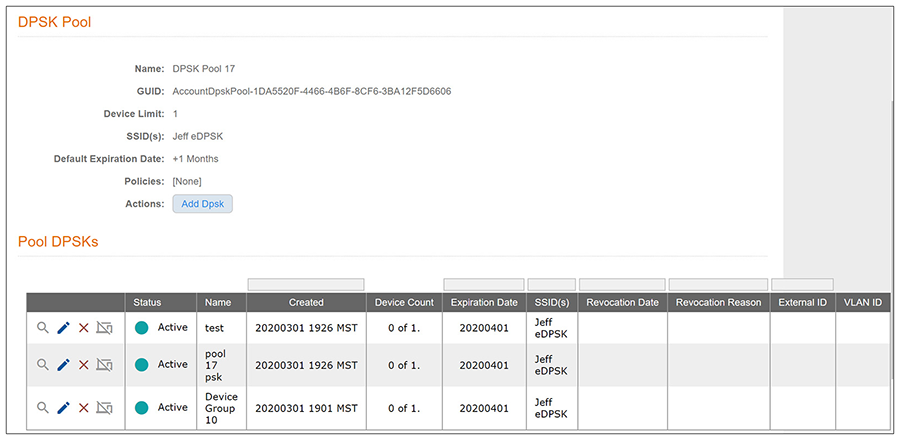
If you go to Configuration > DPSK Pools and expand a pool, then click View, Edit or Revoke DPSKs (refer to Adding a DPSK to an Existing Pool ) you can view all the DPSKs that have been generated for that pool. The screen below shows the DPSKs for a pool called "DPSK Pool 17."
Some of the things you can do include:
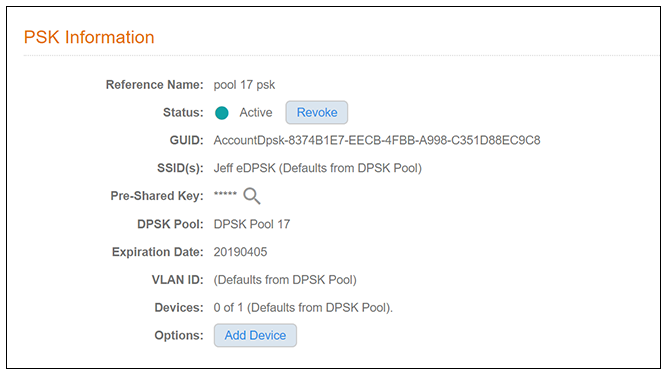
- Add a device to an existing DPSK: If this DPSK has not reached a configurable limit of supported devices, you can add more devices by clicking the magnifying glass icon in the far-left column for the corresponding DPSK. The PSK Information screen for that DPSK appears, an example of which is shown below: Click Add Device, then in the popup screen that appears, enter the MAC address of the device, the SSID to which it will be allowed to connect, then click Done.
- View the pre-shared key: Click the magnifying glass in the Pre-Shared Key field on the PSK Information screen, shown in PSK Information Screen.
- Revoke the DPSK: You can click
Revoke DPSK from the PSK Information screen (shown above), or you can click the Revoke DPSK icon
(to the right of the
X icon) on the DPSK Pools screen (with expanded list of DPSKs), shown in
List of DPSKs Within a Specific Pool - Actions You Can Take.
Note: Revoking a DPSK leaves its records in the database for auditing purposes, and allows you to unrevoke it if you ever need to.
- Delete DPSK from pool: To delete the DPSK from its pool, click the
X icon to the left of the corresponding DPSK.
Note: Deleting a DPSK removes any record that it existed.
- Editing the DPSK: To make changes to the current settings for this DPSK, click the pencil icon for that DPSK. The configuration screen for the DPSK is invoked, and you can make any changes you want.
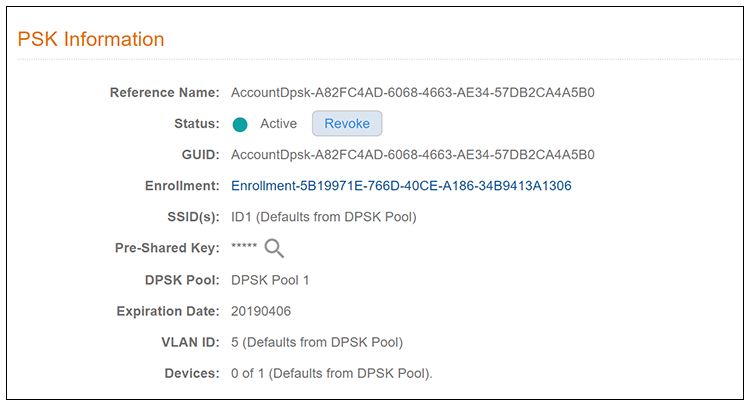
- View enrollment data: Once a DPSK has been used to enroll a device, the PSK Information screen for the device will contain an Enrollment link that you click. An example is shown in the following figure: This link brings you to a page that contains many categories of information about the enrollment, including device, workflow, and notification data.
Dashboard Information
For a listing of all DPSKs, go to Dashboard > DPSKs, as shown in the following example figure:
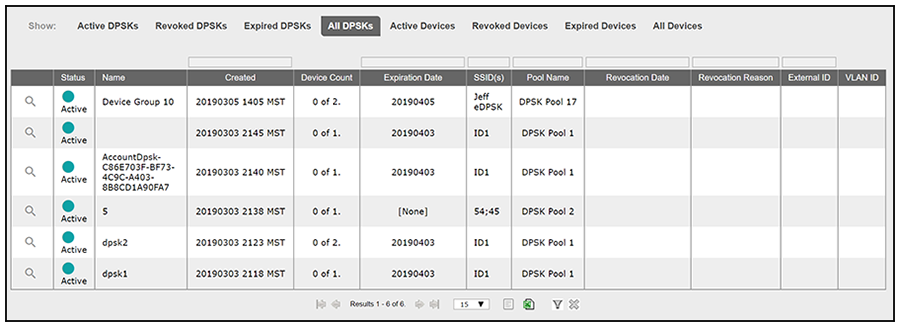
To view all DPSKs created in the system, highlight the All DPSKs tab. Use the other tabs as desired. To view information about a specific DPSK, click the magnifying glass icon.