Setting up an eDPSK Workflow
The figure below shows a simple workflow example that incorporates eDPSK:
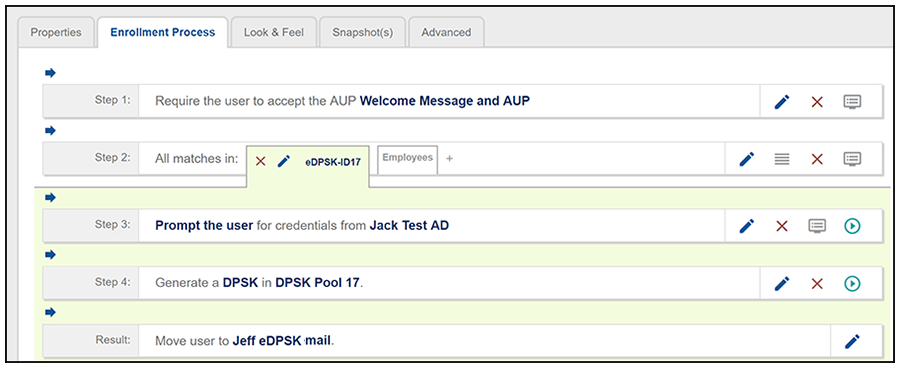
The concept of workflows and how to create one is described in detail in the Cloudpath Enrollment System Administration Guide and the Cloudpath Enrollment System Quick Start Guide. Therefore, the purpose of the procedure in this section is to demonstrate how to add the eDPSK step to a workflow.
Step 3 in the workflow example shows an authentication step that you might want to have. Then, to create Step 4, which is the DPSK pool step, you would do the following:
- Click the arrow underneath Step 3 above to insert a step. You are presented with a screen that has the text: "Which type of step should be added?"
- Scroll down and click the "Generate a Ruckus DPSK" button.
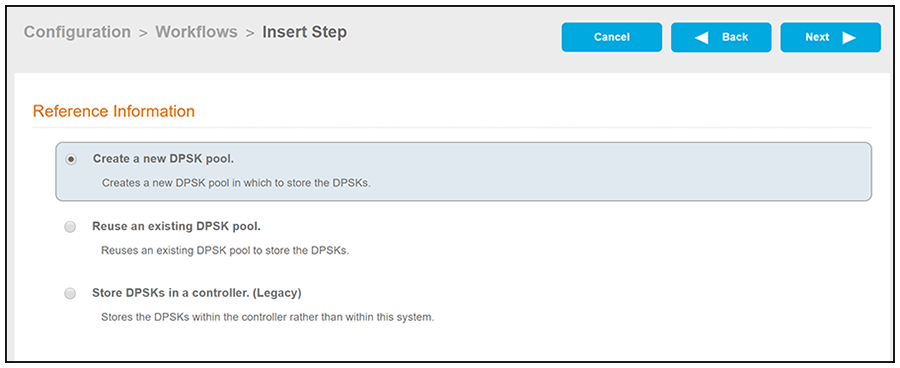
- You are presented with the following options next:
Note: The "Reuse an existing DPSK pool" option appears only if you have already configured one or more DPSK pools.
- You could choose either of the DPSK "pool options." If you choose to create a new DPSK pool and click Next, you are then taken to the DPSK Pool configuration screen (which is described in Creating an eDPSK Pool for Use With External DPSK). If you choose to reuse an existing pool and click Next, you are taken to a screen that has a drop-down menu to choose the pool you wish to add to this workflow.
- Once you have completed the DPSK pool step, you can edit the plugin to have the pre-shared
key emailed to the user:
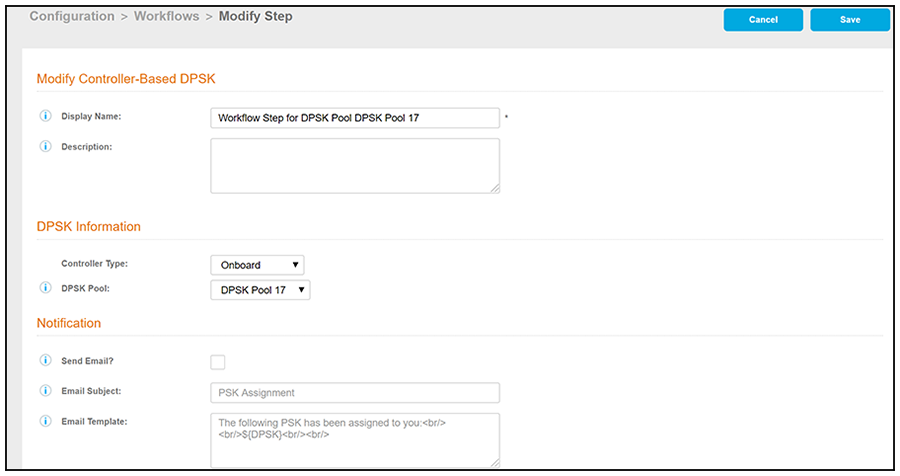
- Click the pencil icon to the right of the DPSK Pool plugin (step 4 in Sample eDPSK Workflow).
- On the ensuing screen, check the "Send Email" checkbox (see the Notifications area of the screen below). This box is unchecked by default.
- Optionally, you can also edit the Email Subject and Email Template fields.
- Click Save when you are
done.
As the user goes through the enrollment process, an email notification gets sent to the user, as shown in the following example:
- For the Result step, create a device configuration where you select one of the External DPSK SSIDs that you have configured on the controller (refer to Configuring an External DPSK WLAN on a Ruckus SmartZone Controller) that has been configured as one of the SSIDs in the DPSK pool used in this workflow.

Once the user enrolls, the device used for enrollment contains the pre-shared key for the network. The pre-shared key is assigned to the enrolled user, and will continue to be in use until its configured expiration date. The pre-shared key can be used only on the enrollment device. As administrator, you can obtain information about the newly created DPSK by referring to Managing eDPSK Pools and DPSKs.