Setting Up the Virtual Machine Using KVM virt-manager GUI
Ensure the KVM host is running on a suitable server with proper network configuration. You must have a KVM virtualization environment that is suitably installed and configured before you can start a guest VM.
Pre-requisite: Packet virt-manager must be installed on the host which is running KVM. Also, X-11 must be enabled in SSH configuration.To create a new virtual machine using virt-manager application, complete the following steps:
- Issue the
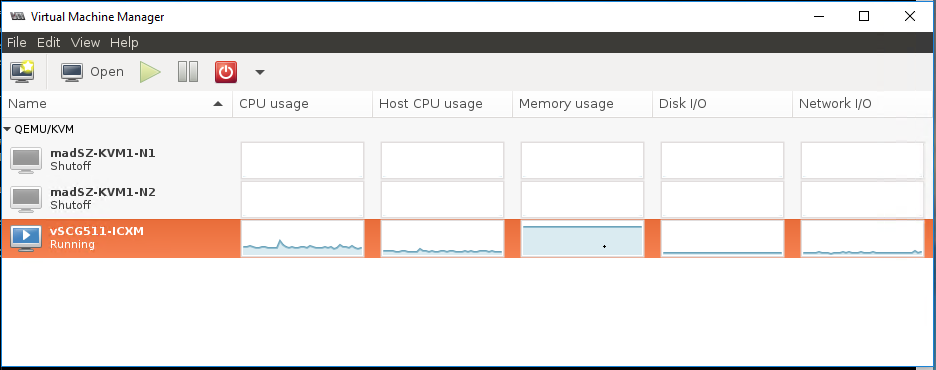
virt-managercommand on the KVM host to launch the virtual machine manager GUI.The Virtual Machine Manager application user interface gets launched. - Click
 , the
Create new virtual machine icon to create new Virtual Machine. The
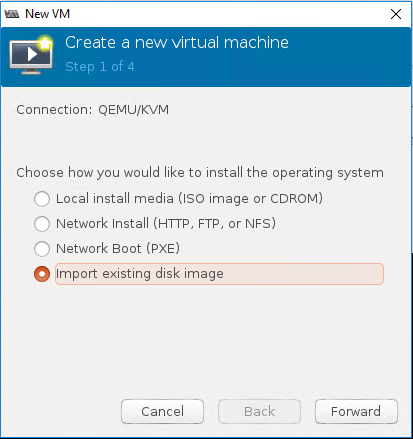
New VM wizard is displayed
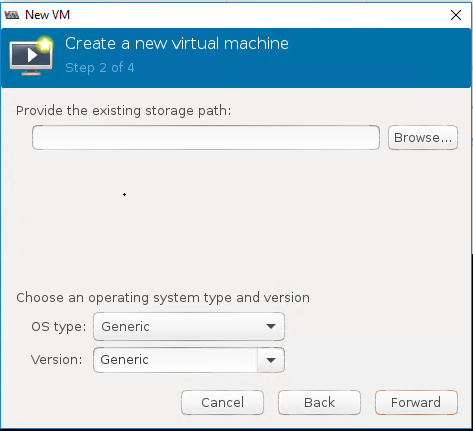
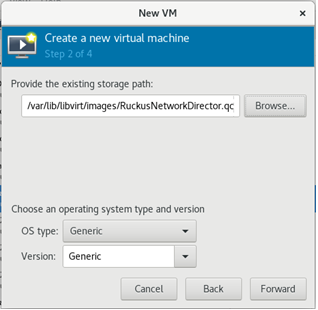
- Select Import existing disk image to create a new virtual machine and import a disk image that contains pre-installed, bootable operating system. Click Forward to continue. Screen (2 of 4) of the wizard is displayed.
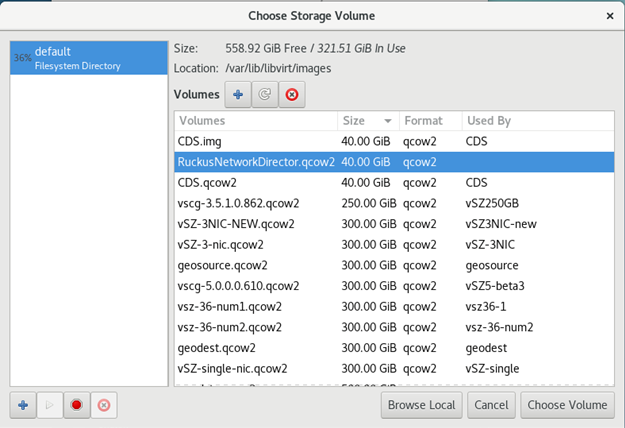
- Click Browse to select the location of “RuckusNetworkDirector.qcow2” image. The Choose Storage Volume screen is displayed.
- Select "RuckusNetworkDirector.qcow2" image and click Choose Volume. The selected storage path is populated in the wizard step 2 of 4. Leave the operating system type and OS version as Generic.
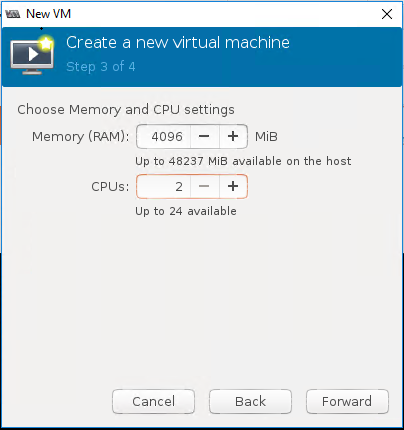
- Click Forward to continue. Screen (3 of 4) of the wizard that allows you to define RAM and CPU is displayed.
- Configure the number of CPUs and amount of memory to allocate to the virtual machine.
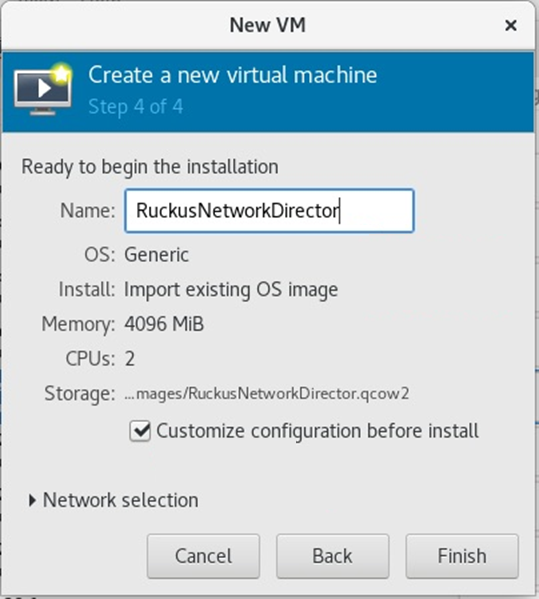
- Click Forward to continue. Screen (4 of 4) of the wizard is displayed.
- Enter the name as RuckusNetworkDirector for the virtual machine in the Name field.
- Select the Customize configuration before install option to make required changes in the settings to match with end user’s host configuration before completing the installation process as described in step 11 through step 14.
- Click Finish to create a new virtual machine. A new window that allows you to initiate the installation is displayed.
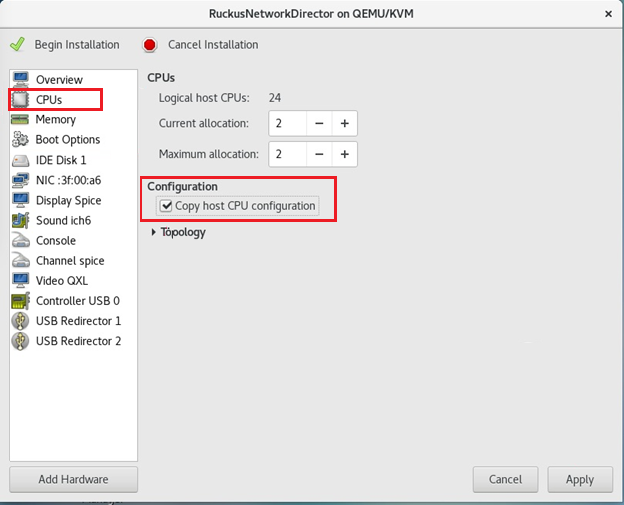
- Select CPUs settings and enable Copy host CPU configuration option. Click Apply to save the changes.
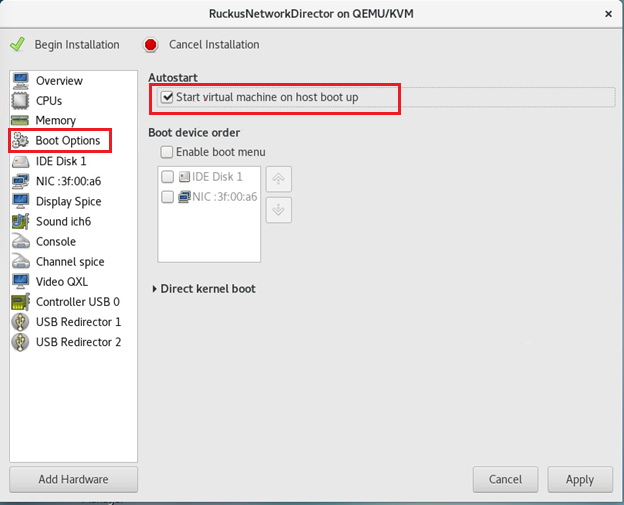
- Select Boot Options settings and enable Start virtual machine on host bootup option. Click Apply to save the changes.
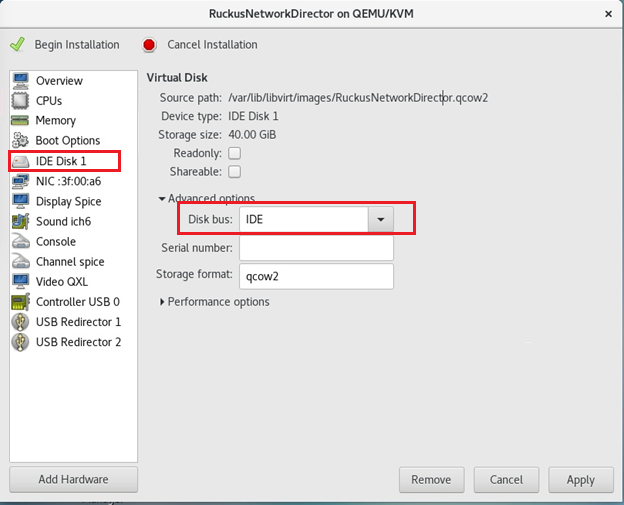
- Select IDE Disk 1 settings. Under the Advance options, choose IDE from the Disk bus dropdown list. Click Apply to save the changes.
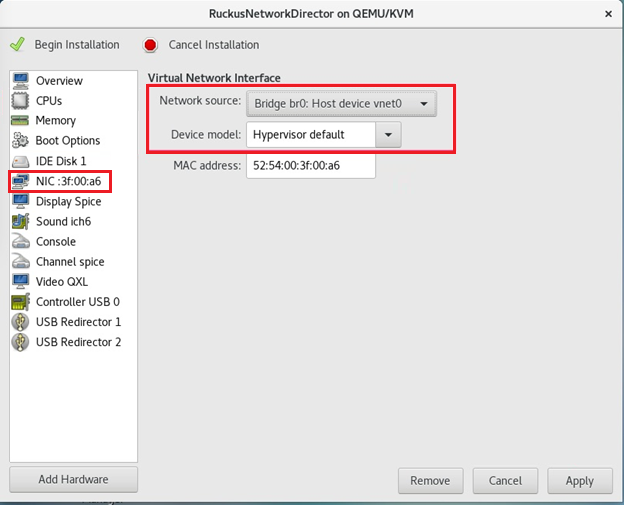
- Select NIC settings and select bridge or dedicated network adapter as per the requirement. Click Apply to save the changes.
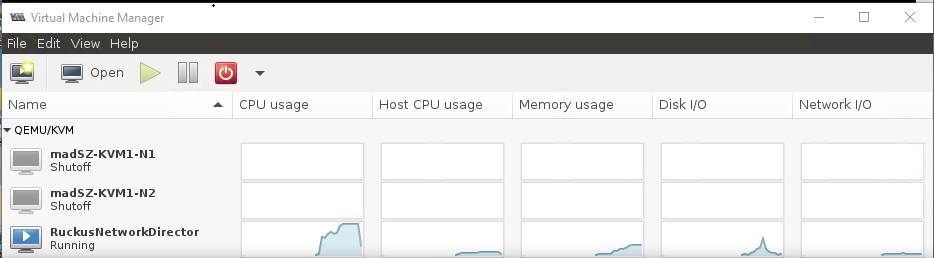
- Click Begin Installation. After successful installation, the status of the virtual machine is indicated as Running in the console.

Basic System Settings after VM Install
Complete the following steps to configure the basic system settings:
- Log in using the default credentials (root/root).
- Change the password as soon as you log in to the system by providing the new password and confirming it by retyping the password.
- Add a user account.
- Add the user to "sudo" privileges.
Allow root to run any commands anywhere by adding the line "myname" with your username.
root    ALL=(ALL)       ALL
myname        ALL=(ALL)       ALL

<escape><write, quit>
[root@ruckusnetworkdirector ~]# vi /etc/ssh/sshd_config
Find the following section to disallow root login by uncommenting and changing #PermitRootLogin yes to PermitRootLogin no.
# Authentication:

#LoginGraceTime 2m
PermitRootLogin no
#StrictModes yes
#MaxAuthTries 6
#MaxSessions 10
Find the following section and comment out X11Forwarding yes.
#AllowAgentForwarding yes
#AllowTcpForwarding yes
#GatewayPorts no
#X11Forwarding yes
#X11DisplayOffset 10
#X11UseLocalhost yes
#PermitTTY yes

<escape><write, quit>
- Restart the SSH daemon.
Setting a static IP address (optional)
- Determine the name of your ethernet NIC. In the following example, the name is "ens3".
[root@ruckusnetworkdirector ~]# ifconfig -a ens3: flags=4163<UP,BROADCAST,RUNNING,MULTICAST> mtu 1500 inet 192.168.0.208 netmask 255.255.255.0 broadcast 192.168.0.255 inet6 fe80::dd9c:3021:ae23:aed0 prefixlen 64 scopeid 0x20<link> ether 52:54:00:3f:00:a6 txqueuelen 1000 (Ethernet) RX packets 398 bytes 41448 (40.4 KiB) RX errors 0 dropped 8 overruns 0 frame 0 TX packets 166 bytes 23160 (22.6 KiB) TX errors 0 dropped 0 overruns 0 carrier 0 collisions 0 lo: flags=73<UP,LOOPBACK,RUNNING> mtu 65536 inet 127.0.0.1 netmask 255.0.0.0 inet6 ::1 prefixlen 128 scopeid 0x10<host> loop txqueuelen 1 (Local Loopback) RX packets 524 bytes 66408 (64.8 KiB) RX errors 0 dropped 0 overruns 0 frame 0 TX packets 524 bytes 66408 (64.8 KiB) TX errors 0 dropped 0 overruns 0 carrier 0 collisions 0 [root@ruckusnetworkdirector ~]# cd /etc/sysconfig/network-scripts/ mv ifcfg-ens160 ifcfg-ens3 vi /etc/sysconfig/network-scripts/ifcfg-ens3 - Restart the networking service.
- Verify the static IP address.
ifconfig -a ens3: flags=4163<UP,BROADCAST,RUNNING,MULTICAST> mtu 1500 inet 192.168.0.95 netmask 255.255.255.0 broadcast 192.168.0.255 inet6 fe80::5054:ff:fe3f:a6 prefixlen 64 scopeid 0x20<link> ether 52:54:00:3f:00:a6 txqueuelen 1000 (Ethernet) RX packets 1501 bytes 155067 (151.4 KiB) RX errors 0 dropped 88 overruns 0 frame 0 TX packets 602 bytes 118303 (115.5 KiB) TX errors 0 dropped 0 overruns 0 carrier 0 collisions 0 - Reboot the system.