Building a Converged IoT Insights Network
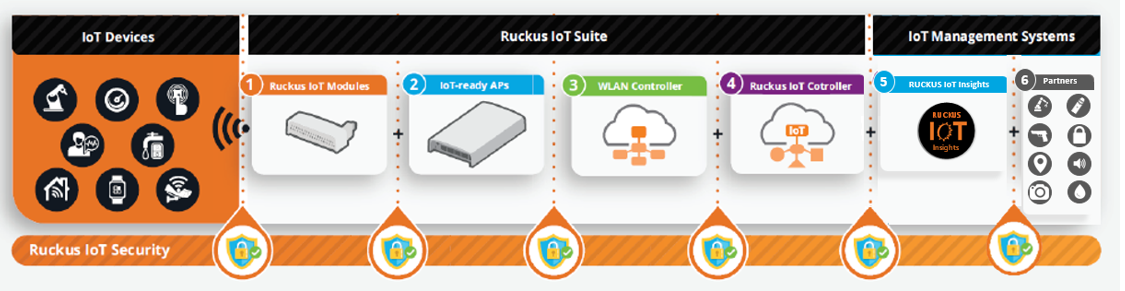
The RUCKUS IoT Insights provides connectivity via the IoT gateways and RUCKUS IoT Controller to a wide range of IoT connected devices. The RUCKUS IoT Insights is able to connect seamlessly to z-wave, LoRa, Zigbee, BLE & IP based IoT sensors through a common network interface without the need of multiple overlay gateway networks. The installers can now deploy a single RUCKUS WiFi access point, and include multiple IoT protocols on the same cable, which reduces the switch port cost, complexity and time. After the AP’s are deployed, the RUCKUS IoT Insights aggregates the traffic into a single place, and decodes the payload into a standard format for processing, logging and reporting. In addition to the payload conversion, RUCKUS IoT Insights provides framework and solution. These solutions provide view into the data and meet the needs of the operator. With the RUCKUS IoT Insights, solutions one platform can solve the monitoring, reporting and compliance requirements of the user without the need of third parties subscriptions, networks or gateways.
Step 1: Installing a RUCKUS IoT Controller
The RUCKUS IoT Controller is a virtual controller that integrates with the SmartZone Controller to perform connectivity, device, and security management functions for non-Wi-Fi devices. The RUCKUS IoT Controller can be installed on the three hypervisors described in the following table.
RUCKUS IoT Controller Supported Hypervisors
| Hypervisor | Vendor | Version |
|---|---|---|
| ESXi | VMware | 6.0 and later |
| KVM | Linux | 2.11.1 and later |
| Hyper-V | Microsoft Windows | 6.2 and later |
Note: Refer to the websites of the respective vendors for information about compatible hardware for the hypervisors.
Before you begin installing the RUCKUS IoT Controller on any hypervisor, consider the following prerequisites:
- Ports 80, 123 (or NTP), 443, 1883, and 8883 must be open.
- The virtual machine (VM) on which the RUCKUS IoT Controller is installed must have a minimum of 4 vCPUs, 4 GB RAM, and fixed 20-GB HDD.
Note: You must obtain robust and reliable server hardware that will support a virtualized environment for IoT applications with enough headroom to expand in the future. Each deployment is unique and hardware specifications will need to be adapted to specific needs. For a typical deployment (for example, RUCKUS IoT Controller, VMware ESXi, Ubuntu Linux server, IP camera VMS, additional IoT VMs or applications), RUCKUS recommends server hardware that meets the following specifications:
For information on how to install the RUCKUS IoT Controller, refer to the RUCKUS IoT Controller Installation Guide.
Step 2: Deploying RUCKUS Access Points and Ensuring Discovery of Controllers
Using the Dynamic Host Configuration Protocol (DHCP) Option 43 method, deploy RUCKUS Access Points (APs) and ensure discovery of the WLAN Controller and, subsequently, of the RUCKUS IoT Controller.
The IoT APs support Option 43 with the following suboptions:
- Suboption 21: Used to configure a RUCKUS IoT Controller IPv4 address or fully qualified domain name (FQDN) (mandatory).
- Suboption 22: Used to set the control VLAN for IoT control or data traffic.
Option 43 supports both binary and ASCII formats. The IoT Access Point bootup process checks for Option 43 and suboptions 21 and 22. After the application receives this information, it uses the information to connect to the RUCKUS IoT Controller over the Pubsub channel.
You can use the DHCP Option 43 suboption code 06 to set the SmartCell Gateway, SmartZone, or virtual SmartZone IP address in the following format: SubCode/Length/(Value in Hex). For example, if the IP address is 10.24.123.4, the hex string would be 06 0b 31302e32342e3132332e34.
The DHCP Option 43 suboptions 21 and 22 are is used to set the RUCKUS IoT Controller IP address.
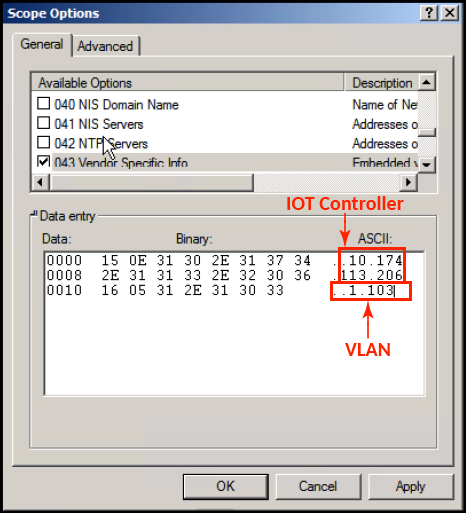
Linux DHCP Option 43 suboption 21 uses the following configurations:
DHCP Option 43 suboption 22 (vlan_mode.vlan_id) uses the following configurations:
- #option RKUS.iotvlan-address "0.4" -(Enables onlink VLAN)
- #option RKUS.iotvlan-address "1.4" -(Enables offlink VLAN)
The offlink VLAN configuration is used when the IoT Gateway APs and the RUCKUS IoT Controller are in different networks. The onlink VLAN configuration is used when the IoT Gateway APs and RUCKUS IoT Controller are in the same network.
Step 3: Configuring the RUCKUS IoT Controller and Initializing IoT Services
The RUCKUS IoT APs and devices can be managed using the RUCKUS IoT Controller.
Before you begin configuring RUCKUS IoT Controller services, consider the following prerequisites:
- The controller must be installed on a hypervisor.
- The required credentials to log in to the RUCKUS IoT Controller must be secured.
For information on how to configure the RUCKUS IoT Controller, refer to the RUCKUS IoT Controller Configuration Guide.
Step 4: Installing the RUCKUS IoT Insights Platform
The RUCKUS IoT Insights platform is a virtual machine that combines the management and data access capabilities for all the IoT sensors in the network.
The RUCKUS IoT Insights can be installed on the hypervisors described in the following table.
RUCKUS IoT Insights Supported Hypervisors
| Hypervisor | Vendor | Version |
|---|---|---|
| ESXi | VMware | 6.0 and later |
| KVM | Linux | 2.11.1 and later |
Before you begin installing the RUCKUS IoT Insights platform on your hypervisor you must ensure that the following ports are accessible between RUCKUS IoT Insights and any and all external sensor and service providers.
- Port 443: Primary port for API and access to user interface
- Port 7002: Used for LoRa LNS connectivity on the IoT Controller
- Port 3001: Default for Websocket and Webhook Communications (May be changed in setup and adjusted as needed)
- Port 3883: Default MQTT port used to connect to the IoT Controller (May be changed in setup and adjusted as needed)
In addition to the accessible ports, the VM for RUCKUS IoT Insights must have sufficient resources to operate. Depending on the scale of the deployment, those resources must adhere to the following guidelines:
- Small Scale: A single IoT
Controller with no additional third-party connected services or solutions
with up to 1,000 connected devices.
Before you begin installing RUCKUS IoT Insights on any hypervisor, consider the following small scale prerequisites:
- Medium Scale:
A single IoT Controller with external device partner services (which may include Axis Cameras, Rigado Gateways, LoRa Network Server, Samsung devices or services). The external services provide increased device count and connectivity, with an increased device count of up to 2,000 devices and additional location-based service capability.
Before you begin installing the RUCKUS IoT Insights on any hypervisor, consider the following prerequisites for medium scale:
- Large Scale:
Large Scale: Considered for deployments with a fully loaded IoT Controller with a large AP count generating a lot of IoT device traffic and for deployments with many BLE tags and BLE services. These deployments are typically used where large numbers of BLE services and location services are taking place. In addition to the BLE services, connected devices and AP counts can typically be up to 5,000 connected devices on up to 500 APs on a single IoT Controller.
Before you begin installing RUCKUS IoT Insights on any hypervisor, consider the following large scale prerequisites:
Step 5: Configure the RUCKUS IoT Insights Platform
The RUCKUS IoT Insights service is fully managed and deployed through the web interface. After the hypervisor is deployed and started, the VM initiates the first-time boot and the system starts the System Configuration Wizard. During this initialization, you must undertake the following steps:
- Initializing a unique serial number for the system
- Creating a user-defined realm name and ID for the installation
- Configuring the network
- Connecting to the RUCKUS IoT Controller
- Defining the ports and connections to the data transport stream on the RUCKUS IoT Controller
- Creating an administrator account
- Agreeing to EULA terms and conditions
- Installing and provisioning the system
Step 6: Initialize the RUCKUS IoT Insights Environment
After you complete the installation, the system reboots, and prompts you to log in to RUCKUS IoT Insights. You can log in using the administrator credentials created with the System Configuration Wizard. The final steps include provisioning the sites, floorplans, locations, and devices for operation.