Expanding Disk Partition on Cloudpath 6.x with VMWare
- Power down the Cloudpath virtual
machine in VMWare.Note: Certain versions of the VMs do not allow memory configurations while the VM is powered on.
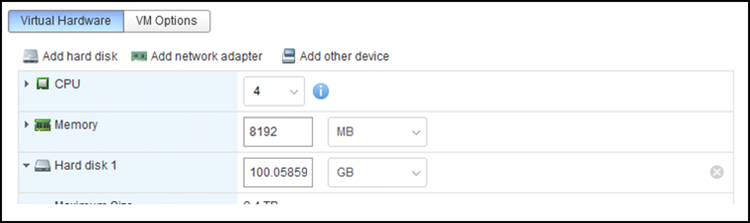
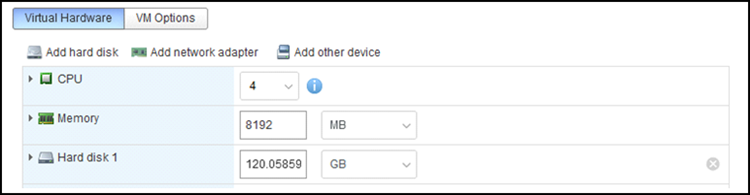
- Edit the VM settings as shown in
the images below, then save the changes.
Note that the disk partitions inside the operating system remain the same. Therefore, you must expand the MySQL partition on this server using the following steps.
The following displays the default partition size (58 G):
[root@jack155 ~]# df -h
Filesystem                 Size  Used Avail Use% Mounted on
devtmpfs                   4.0M     0  4.0M   0% /dev
tmpfs                      3.8G     0  3.8G   0% /dev/shm
tmpfs                      1.6G   17M  1.5G   2% /run
/dev/mapper/vg_root-root    20G  1.4G   18G   8% /
/dev/sda1                  974M  202M  705M  23% /boot
/dev/mapper/vg_root-log     10G  399M  9.6G   4% /var/log
/dev/mapper/vg_root-tmp    436M   29M  408M   7% /tmp
/dev/mapper/vg_root-opt     10G  1.9G  8.1G  19% /opt
/dev/mapper/vg_root-mysql   58G  842M   57G   2% /var/lib/mysql
tmpfs                      769M     0  769M   0% /run/user/1001
- Power on the Cloudpath VM.
- After the VM has successfully booted, connect to the VM using either SSH or the console interface, depending on your environment and access preferences.
- Use the
sudocommand to attain root privileges. - Use the
fdisk -lcommand to view details of the disk.[root@jack155 ~]# fdisk -l Disk /dev/sda: 120.06 GiB, 128911932416 bytes, 251781118 sectors Disk model: Virtual disk Units: sectors of 1 * 512 = 512 bytes Sector size (logical/physical): 512 bytes / 512 bytes I/O size (minimum/optimal): 512 bytes / 512 bytes Disklabel type: dos Disk identifier: 0x4af27b89 Device Boot Start End Sectors Size Id Type /dev/sda1 * 2048 2099199 2097152 1G 83 Linux /dev/sda2 2099200 4196351 2097152 1G 82 Linux swap / Solaris /dev/sda3 4196352 209836031 205639680 98.1G 8e Linux LVM Disk /dev/mapper/vg_root-root: 20 GiB, 21474836480 bytes, 41943040 sectors Units: sectors of 1 * 512 = 512 bytes Sector size (logical/physical): 512 bytes / 512 bytes I/O size (minimum/optimal): 512 bytes / 512 bytes Disk /dev/mapper/vg_root-mysql: 57.57 GiB, 61811458048 bytes, 120725504 sectors Units: sectors of 1 * 512 = 512 bytes Sector size (logical/physical): 512 bytes / 512 bytes I/O size (minimum/optimal): 512 bytes / 512 bytes Disk /dev/mapper/vg_root-log: 10 GiB, 10737418240 bytes, 20971520 sectors Units: sectors of 1 * 512 = 512 bytes Sector size (logical/physical): 512 bytes / 512 bytes I/O size (minimum/optimal): 512 bytes / 512 bytes Disk /dev/mapper/vg_root-opt: 10 GiB, 10737418240 bytes, 20971520 sectors Units: sectors of 1 * 512 = 512 bytes Sector size (logical/physical): 512 bytes / 512 bytes I/O size (minimum/optimal): 512 bytes / 512 bytes Disk /dev/mapper/vg_root-tmp: 500 MiB, 524288000 bytes, 1024000 sectors Units: sectors of 1 * 512 = 512 bytes Sector size (logical/physical): 512 bytes / 512 bytes I/O size (minimum/optimal): 512 bytes / 512 bytes
Notice that the screen displays the following:
Disk /dev/sda: 120.06 GiB, 128911932416 bytes, 251781118 sectors
The operating system identifies the physical disk as
/dev/sda. Within Cloudpath, all logical volumes are organized into a single volume group located on the/dev/sda3partition. The remaining two partitions serve specific system functions: one is designated as the boot partition, and the other is used for swap space. - Use the
fdisk /dev/sdacommand to modify the physical disk partition table.[root@jack155 ~]# fdisk /dev/sda Welcome to fdisk (util-linux 2.37.4). Changes will remain in memory only, until you decide to write them. Be careful before using the write command. This disk is currently in use - repartitioning is probably a bad idea. It's recommended to umount all file systems, and swapoff all swap partitions on this disk.
Note: Ignore the warning message that is displayed in the command line interface. - Enter
nfor new partition. - Complete the following steps.
- Start partition creation by entering
p. - Confirm the partition number.
- Press Enter to set the starting sector.
- Press Enter to set the ending sector.
- Enter
tto change the partition type. - Enter
4to select the newly created partition. - Enter
8eto assign the Linux Logical Volume Manager (LVM) type. Note that 8e is the hex code or alias for Linux LVM. - Enter w to save and apply the changes.
- Start partition creation by entering
- Use the
pvcreatecommand to create the new physical volume, /dev/sda4. - Use the
vgdisplaycommand to display the volume groups.[root@jack155 ~]# vgdisplay --- Volume group --- VG Name vg_root System ID Format lvm2 Metadata Areas 1 Metadata Sequence No 6 VG Access read/write VG Status resizable MAX LV 0 Cur LV 5 Open LV 5 Max PV 0 Cur PV 1 Act PV 1 VG Size 98.05 GiB PE Size 4.00 MiB Total PE 25102 Alloc PE / Size 25102 / 98.05 GiB Free PE / Size 0 / 0 VG UUID M0gU39-knic-RWra-3NUD-VreH-Xxd2-5UXYMI
Note: You may still see that the free physical extents (PE) attribute, Free PE / Size, is shown as 0 / 0. - Use the
vgextend vg_root
                     						/dev/sda4
command to extend the volume group and then use thevgdisplaycommand to view the free PE size.[root@jack155 ~]# vgextend vg_root /dev/sda4 Volume group "vg_root" successfully extended
[root@jack155 ~]# vgdisplay
  --- Volume group ---
  VG Name               vg_root
  System ID
  Format                lvm2
  Metadata Areas        2
  Metadata Sequence No  7
  VG Access             read/write
  VG Status             resizable
  MAX LV                0
  Cur LV                5
  Open LV               5
  Max PV                0
  Cur PV                2
  Act PV                2
  VG Size               118.05 GiB
  PE Size               4.00 MiB
  Total PE              30221
  Alloc PE / Size       25102 / 98.05 GiB
  Free  PE / Size       5119 / <20.00 GiB
  VG UUID               M0gU39-knic-RWra-3NUD-VreH-Xxd2-5UXYMI
- Use the
pvscancommand to scan physical volumes and to view the new partition /dev/sda4. - Use the
lvextendcommand to extend the logical volume for /dev/mapper/vg_root-mysql.[root@jack155 ~]# lvextend -L+19.9G /dev/mapper/vg_root-mysql Rounding size to boundary between physical extents: 19.90 GiB. Size of logical volume vg_root/mysql changed from <57.57 GiB (14737 extents) to <77.47 GiB (19832 extents). Logical volume vg_root/mysql successfully resized.
Note: To avoid possible binary math issues, only extend the volume by 19.9 GiB as entering 20 GiB may return an error because it is a few sectors short. - Use the
xfs_growfs
                     						/dev/mapper/vg_root-mysql
command to expand the file system to use the new space.[root@jack155 ~]# xfs_growfs /dev/mapper/vg_root-mysql meta-data=/dev/mapper/vg_root-mysql isize=512 agcount=4, agsize=3772672 blks = sectsz=512 attr=2, projid32bit=1 = crc=1 finobt=1, sparse=1, rmapbt=0 = reflink=1 bigtime=1 inobtcount=1 nrext64=0 data = bsize=4096 blocks=15090688, imaxpct=25 = sunit=0 swidth=0 blks naming =version 2 bsize=4096 ascii-ci=0, ftype=1 log =internal log bsize=4096 blocks=16384, version=2 = sectsz=512 sunit=0 blks, lazy-count=1 realtime =none extsz=4096 blocks=0, rtextents=0 data blocks changed from 15090688 to 20307968 - Use the
df -hcommand to display the MySQL partition.[root@jack155 ~]# df -h Filesystem Size Used Avail Use% Mounted on devtmpfs 4.0M 0 4.0M 0% /dev tmpfs 3.8G 0 3.8G 0% /dev/shm tmpfs 1.6G 17M 1.5G 2% /run /dev/mapper/vg_root-root 20G 1.4G 18G 8% / /dev/sda1 974M 202M 705M 23% /boot /dev/mapper/vg_root-tmp 436M 29M 408M 7% /tmp /dev/mapper/vg_root-opt 10G 951M 9.1G 10% /opt /dev/mapper/vg_root-mysql 78G 961M 77G 2% /var/lib/mysql /dev/mapper/vg_root-log 10G 116M 9.9G 2% /var/log tmpfs 769M 0 769M 0% /run/user/1001 tmpfs 769M 0 769M 0% /run/user/0