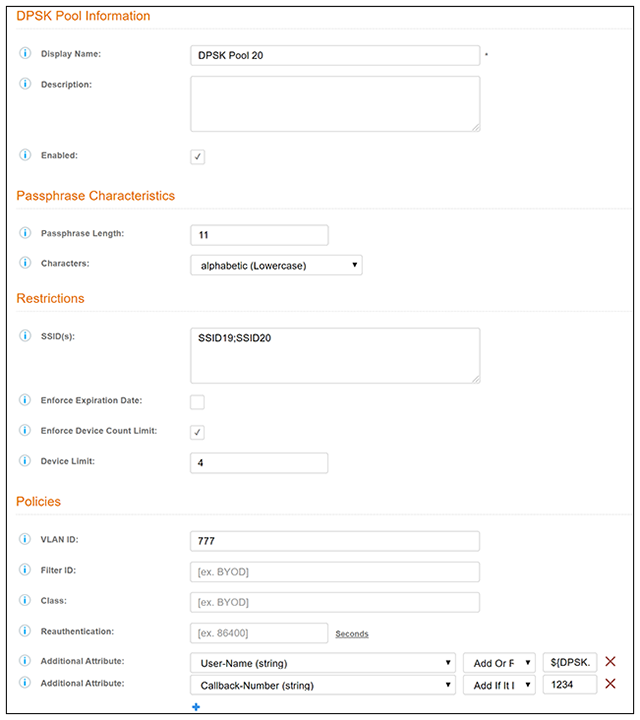
DPSK Pools
The following table lists the properties that can be used in the body of a DPSK-pool-related request and/or are provided in the response body. (In the "Optional" column, if a default value is applicable, it is listed in angle brackets (< >).
Resource: DPSK Pools
Resource: Additional Attributes:
The following table lists the additional-attribute properties to apply to RADIUS configurations that can be used in the body of a DPSK-pool-related request and/or are provided in the response body.
Resource: Additional Attributes
| Property Name | Type | Editable | Filter or Sort | Optional? | Description |
|---|---|---|---|---|---|
| name | String | Yes | No | No | The RADIUS attribute to use. |
| action | String <Enum> | Yes | No | No | The action to take must be one of the following: ADD, ADD_OR_REPLACE, or ADD_MULTIPLE. |
| value | String | Yes | No | No | The value to substitute. |
DPSK Pool URIs and Actions
The following table indicates the URIs that you can append to the root URI, along with the actions you can take, and possible return codes you can receive.
DPSK Pool URIs and Actions
Example of Using GET for DPSK Pools
This example demonstrates how to obtain information about a DPSK pool that has already been created in the Cloudpath UI. (Instructions on creating DPSK pools in the UI are located in the Cloudpath Enrollment System Ruckus External Dynamic Pre-Shared Key (eDPSK) Configuration Guide.) The following figure shows information about a DPSK pool called DPSK Pool 1 that has been created in the UI.
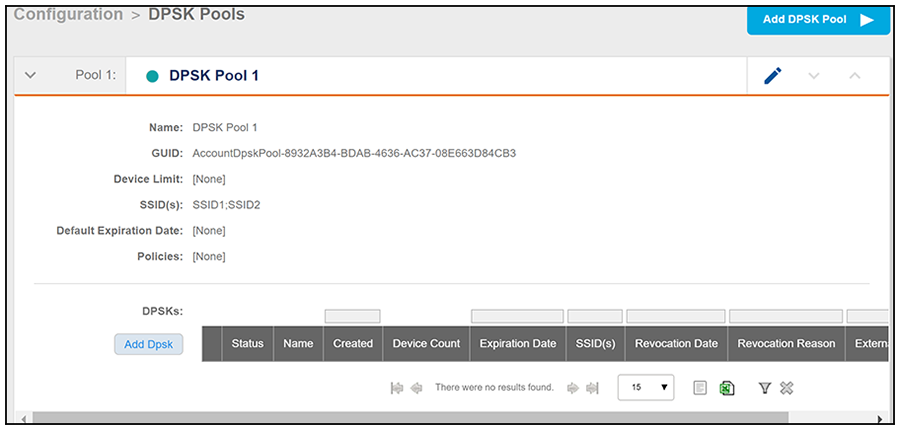
This example uses the following URI:
https://Jeff243.cloudpath.net/admin/apiv2/BmGsez6evQc8/dpskPools
- https://Jeff243.cloudpath.net/admin/apiv2 is the root URI of the Cloudpath system being used (must include https, as shown)
- BmGsez6evQc8 is an example of an API key generated from the Configuration > API Keys section of the Cloudpath UI
The following table shows the required request headers for this URI example, with an example value of an active token that must be pasted into the Authorization header value:
Request Headers
| Key | Value |
|---|---|
| Content-type | application/json |
| Authorization | eyJhbGciOiJIUzI1NiJ9.eyJzdWIiOiJqZWZmLnJob2RpZUBjb21tc2NvcGUuY29tIiwicm9sZVBrIjoiMjEwMDAiLCJhY2NvdW50QWRtaW5QayI6IjIiLCJhcGlLZXkiOiJaV2NjTGpQZUdZMGUiLCJpYXQiOjE1NzU1NzUxNTcsImV4cCI6MTU3NTU3NTQ1N30.2q4KTyDUevkAAz7mJyp529Be1-ip3EC8P06Xarmz5ao |
None required.
Use the GET action to send the request.
Once the request is sent, you will receive a "Status: 200 OK" if the GET is successful. The response body provides information about all existing DPSK pools in your Cloudpath system. In this example, DPSK Pool 1 is the only existing pool. You can see that the information in the response body matches the configuration of DPSK Pool 1 as specified in the UI (for example, the "guid" values are the same in each place, the SSID list is the same, and so on). Any values that were not specified in the UI are the default values:
{
    "page": {
        "page": 1,
        "pageSize": 1,
        "totalCount": 1
    },
    "contents": [
        {
            "guid": "AccountDpskPool-8932A3B4-BDAB-4636-AC37-08E663D84CB3",
            "displayName": "DPSK Pool 1",
            "description": "",
            "enabled": true,
            "phraseDefaultLength": 12,
            "phraseRandomCharactersType": "ALPHABETIC_LOWER",
            "ssidList": [
                "SSID1",
                "SSID2"
            ],
            "enforceExpirationDate": false,
            "expirationDateType": "MONTHS_AFTER_TIME",
            "expirationDateValue": "1",
            "enforceDeviceCountLimit": false,
            "deviceCountLimit": 1,
            "vlanid": "",
            "filterid": "",
            "classid": "",
            "additionalAttributes": []
        }
    ]
}
Example of Using POST to Create a DPSK Pool
This example demonstrates how to create a new DPSK pool in your Cloudpath system by using the REST API POST call.
This example uses the following URI:
https://Jeff243.cloudpath.net/admin/apiv2/BmGsez6evQc8/dpskPools
- https://Jeff243.cloudpath.net/admin/apiv2 is the root URI of the Cloudpath system being used (must include https, as shown)
- BmGsez6evQc8 is an example of an API key generated from the Configuration > API Keys section of the Cloudpath UI
The following table shows the required request headers for this URI example, with an example value of an active token that must be pasted into the Authorization header value:
Request Headers
| Key | Value |
|---|---|
| Content-type | application/json |
| Authorization | eyJhbGciOiJIUzI1NiJ9.eyJzdWIiOiJqZWZmLnJob2RpZUBjb21tc2NvcGUuY29tIiwicm9sZVBrIjoiMjEwMDAiLCJhY2NvdW50QWRtaW5QayI6IjIiLCJhcGlLZXkiOiJaV2NjTGpQZUdZMGUiLCJpYXQiOjE1NzU1NzUxNTcsImV4cCI6MTU3NTU3NTQ1N30.2q4KTyDUevkAAz7mJyp529Be1-ip3EC8P06Xarmz5ao |
The following is an example of a request body for creating a DPSK pool. You can refer to the preceding Resource tables for a list and descriptions of properties you can use to define your pool. For instance, in this example, a pool called "DPSK Pool 20" is being created with the values provided in the body.
{
    "displayName": "DPSK Pool 20",
    "description": "",
    "enabled": true,
    "phraseDefaultLength": 11,
    "phraseRandomCharactersType": "ALPHABETIC_LOWER",
    "ssidList": [
        "SSID19",
        "SSID20"
    ],
    "enforceExpirationDate": false,
    "expirationDateType": "MONTHS_AFTER_TIME",
    "expirationDateValue": "1",
    "enforceDeviceCountLimit": true,
    "deviceCountLimit": 4,
    "vlanid": "777",
    "filterid": "",
    "classid": "",
    "additionalAttributes": [
        {
            "name": "User-Name",
            "action": "ADD_OR_REPLACE",
            "value": "${DPSK.THRIDPARTY_ID}"
        },
        {
            "name": "Callback-Number",
            "action": "ADD",
            "value": "1234"
        }
    ]
}
Use the POST action to send the request.
Once the request is sent, you will receive a "Status: 201 Created" if the POST is successful. You can see that a "guid" (a unique identifier for the newly created pool) is included in the response body.
{
    "guid": "AccountDpskPool-37AF7D9B-7A3A-4953-B314-10A4758803DE",
    "displayName": "DPSK Pool 20",
    "description": "",
    "enabled": true,
    "phraseDefaultLength": 11,
    "phraseRandomCharactersType": "ALPHABETIC_LOWER",
    "ssidList": [
        "SSID19",
        "SSID20"
    ],
    "enforceExpirationDate": false,
    "expirationDateType": "MONTHS_AFTER_TIME",
    "expirationDateValue": "1",
    "enforceDeviceCountLimit": true,
    "deviceCountLimit": 4,
    "vlanid": "777",
    "filterid": "",
    "classid": "",
    "additionalAttributes": [
        {
            "name": "User-Name",
            "action": "ADD_OR_REPLACE",
            "value": "${DPSK_THIRDPARTY_ID}"
        },
        {
            "name": "Callback-Number",
            "action": "ADD",
            "value": "1234"
        }
    ]
}
Verifying the Newly Created DPSK Pool in the Cloudpath UI:
You can go to the Configuration > DPSK Pools area of the UI, and expand the pool to confirm that the pool was created correctly. The values should match those in the Response body from the POST. For example, in this expanded view, you can see that the GUID matches the one provided in the Response body.
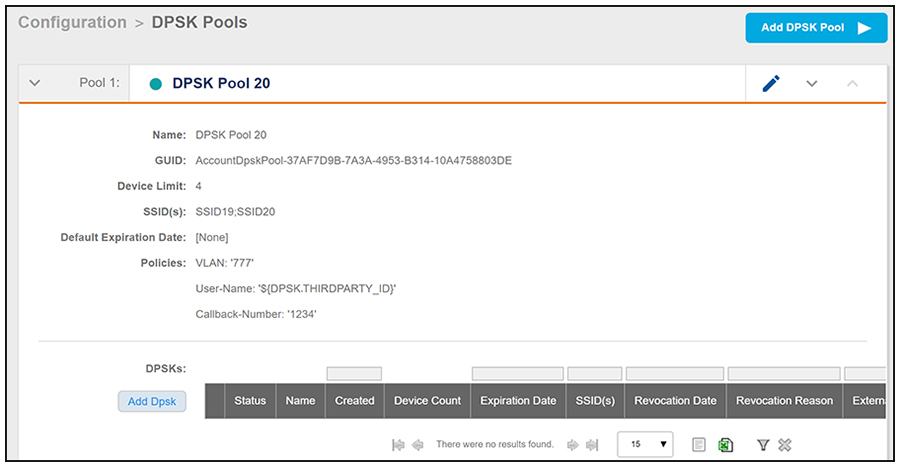
If you go to the Edit view of the pool, you see additional pool values. Again, they should match the values you assigned to the properties you used in your POST.