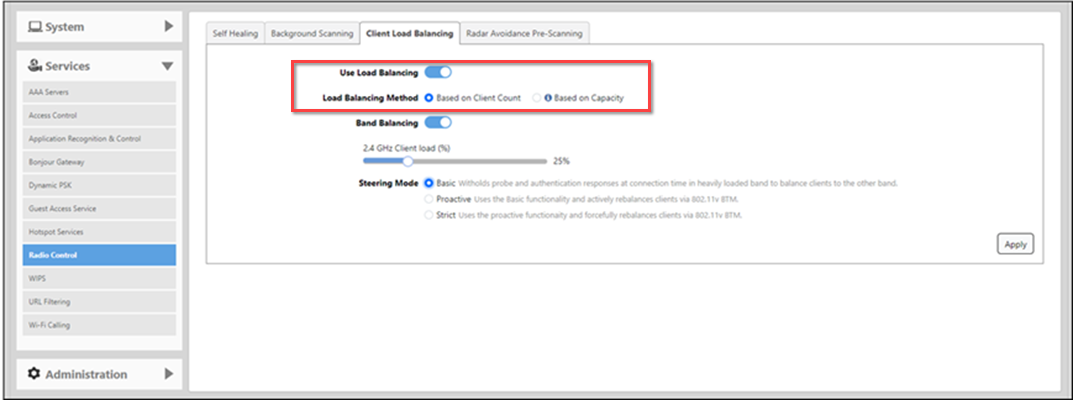
Enabling Load Balancing Globally
Enabling load balancing ensures that
clients are evenly distributed across available access points (APs), preventing
any single
AP from becoming overloaded. It reduces congestion, provides better resource utilization,
and ensures seamless connectivity.
Complete the following steps to enable load balancing options globally.
-
UI path for UnleashedFrom the dashboard, select Admin & Services > Services > Radio Control > Client Load Balancing.
- Enable Use Load Balancing.
- For the Load Balancing
Method, choose any one of the methods: Based on Client
Count or Based on
Capacity.
- Based on Client Count: Distributes clients evenly across APs by considering the number of connected devices. This is considered basic client load balancing.
- Based on Capacity: Allocates clients to APs based on their available capacity, which includes factors such as bandwidth, data rate, and the number of streams. This is considered adaptive client load balancing.
- For Steering Mode,
choose one of the following modes: Basic, Proactive, or
Strict. Steering Mode enhances Wi-Fi efficiency by automatically
allocating devices to the optimal frequency band considering their capabilities
and the prevailing network conditions.
- Basic: Prevents overcrowding on a heavily loaded band by encouraging clients to connect to a less crowded band.
- Proactive: Actively manages and rebalances clients between bands using IEEE 802.11v BSS Transition Management.
- Strict: Forcefully rebalances clients between bands using IEEE 802.11v BSS Transition Management.
- Click Apply.